CCNA Lab 1: Configure Hostname and IP Address
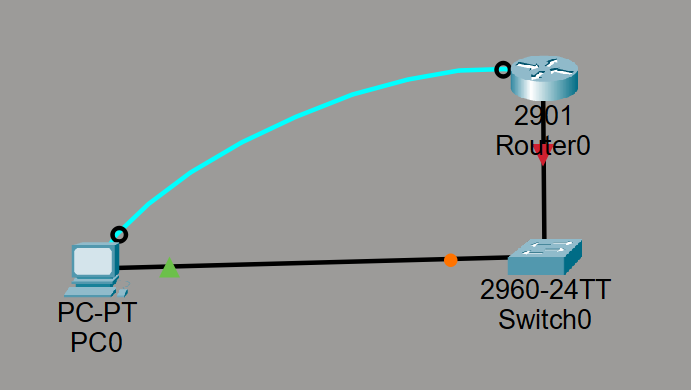
Topology
Addressing Table
| Device | Interface | IP Address | Subnet Mask | Default Gateway |
|---|---|---|---|---|
| R1 | G0/0 | 192.168.1.1 | 255.255.255.0 | N/A |
| PC1 | NIC | 192.168.1.10 | 255.255.255.0 | 192.168.1.1 |
Objectives
Part 1: Build the network and configure basic device settings
Part 2: Configure router hostname and interface addressing
Part 3: Verify connectivity
Background / Scenario
A small office is deploying a new Cisco router. Before the network can go live, the router must be configured with a proper hostname and an IP address on its active interface. In this lab, you will complete the initial setup and verify that the router can communicate with the PC.
Required Resources
- 1 Cisco router
- 1 PC
- 1 switch
- Packet Tracer
- Console or terminal access
- Ethernet cables
Part 1: Build the Network and Configure Basic Device Settings
Step 1: Build the topology.
Connect the PC to the switch and the switch to the router as shown in the topology.
Step 2: Configure the router.
Enter the following commands on R1:
enable
configure terminal
hostname R1
no ip domain-lookup
banner motd # Authorized Access Only #
interface g0/0
ip address 192.168.1.1 255.255.255.0
no shutdown
end
write memory
Step 3: Configure the PC.
Assign the following settings to PC1:
IP Address: 192.168.1.10
Subnet Mask: 255.255.255.0
Default Gateway: 192.168.1.1
Part 2: Configure Hostname and IP Address
Step 1: Verify the hostname.
Use the command:
show running-config
Step 2: Verify the interface configuration.
Use the command:
show ip interface brief
Part 3: Verification
Step 1: Verify interface status.
Confirm that G0/0 is up/up.
Step 2: Test connectivity.
From PC1, ping 192.168.1.1
Expected result:
The ping should succeed.
Step 3: Save the configuration.
Use:
write memory
Reflection Questions
- Why is the no shutdown command required?
- What is the purpose of the default gateway on the PC?
- Which command shows the current status of router interfaces?
Pingback: IPsec VPN Configuration Cisco (LAN-to-LAN) – Packet Tracer Lab - CoreSah Networks IPsec VPN Configuration Cisco (LAN-to-LAN) – Packet Tracer Lab